


Setting up Docker instances to run on an AMD-based macOS Mojave Hackintosh without Hypervisor.framework
This was something I worked on a few months ago, back before HashiCorp announced the open-sourcing of Vagrant’s VMWare Plugin as it required a license earlier that needed to be registered using vagrant plugin license vagrant-vmware-desktop ./license.lic, so this guide probably won’t be of much use if you’re just starting out and get to pick between Docker and Vagrant, pick Vagrant. But if you’re already a Docker user, read ahead (or just use the TL;DR)
(Also, if anyone from HashiCorp is reading this, however unlikely it may be, just want you to give y’all a big thanks for extending the proverbial olive branch! 😊, great job guys!) The plugin source code is now on Github so check that out if you use Vagrant.
Back to Docker and the days of old.
I’ve never really been an adopter of the container mindset, mostly because I didn’t really find a need for it in my use cases and Docker giving me a big fat Environment Error means I couldn’t really be arsed with using it, Virtualbox worked, but it was still Virtualbox and for some reason I’ve had jittery experiences with it, so I decided to use VMWare Fusion.
Existing guides more or less were useful till they weren’t, that prompted me to write mine
Additional Resources⌗
- VMWare Fusion 10.1.3 - VMWare Customer Connect / Download (a direct download link to the last working version of VMWare Fusion)
- mmoorman12’s reply to “macOS Catalina issue [beta]” on the VMWare Technology Network
- Docker and Docker Compose on AMD OSX Hackintosh via Docker Machine by slykar on Github Gist, the original guide that helped me out
- Master p’s answer to “Cannot connect to the Docker daemon on macOS” on StackOverflow (for those few times that
docker-machine env defaultremains stuck) - “docker-machine-driver-vmware: A Docker machine driver for VMware Fusion and Workstation” on Github
- Jawa’s answer to “Is it possible to run VMware Fusion in the background to hide the windows and icons it produces?” on the Ask Different Stack Exchange
Installing VMWare Fusion⌗
In case you don’t have it, the last Hackintosh-friendly version of VMWare Fusion is 10.1.3, Fusion 11 onwards rely on Hypervisor.framework and you’re running an AMD system so… yeah…
# Download VMWare Fusion directly from VMWare, no need to login
wget https://download3.vmware.com/software/fusion/file/VMware-Fusion-10.1.3-9472307.dmg
# Mount it
hdiutil attach ./VMware-Fusion-10.1.3-9472307.dmg
# Copy over the app bundle to /Applications
ditto /Volumes/VMware\ Fusion/VMware\ Fusion.app /Applications/VMware\ Fusion.app
# Detach it
hdiutil detach /Volumes/VMware\ Fusion
# First-time launch, this will require user interaction
# Grant all the relevant Kext permissions and you should be golden on that front
open /Applications/VMware\ Fusion.app
If you’re running macOS Catalina and above, you’ll need to do a few more things
The last friendly version isn’t made with Catalina in mind and that means that you’ll deal with a nagging issue of being shown a black screen instead of the contents of your VM. This is due to increased permission requirements implemented in macOS Catalina.
As Fusion 10.x doesn’t know of these requirements, it doesn’t ask macOS for them and therefore, macOS
blocks those request automatically, to grant those requests, the fix is a bit ugly as it involves
entering disabling SIP for a bit (which requires you to enter Recovery Mode, then running csrutil disable)
The commands for manually granting it permissions are courtesy of mmoorman12 (see “Additional Resources”)
# These commands apply to macOS Catalina
# If SIP is disabled, then give VMWare Fusion permissions
sysIntProtStatus="$(csrutil status)"
if [[ $sysIntProtStatus =~ "disable" ]]; then
  tccutil reset All com.vmware.fusion
  sudo sqlite3 "/Library/Application Support/com.apple.TCC/TCC.db" 'insert into access values ("kTCCServiceScreenCapture", "com.vmware.fusion", 0, 1, 1, "", "", "", "UNUSED", "", 0,1565595574)'
  sudo sqlite3 "/Library/Application Support/com.apple.TCC/TCC.db" 'insert into access values ("kTCCServiceListenEvent", "com.vmware.fusion", 0, 1, 1, "", "", "", "UNUSED", "", 0,1565595574)'
  sudo sqlite3 "/Library/Application Support/com.apple.TCC/TCC.db" 'insert into access values ("kTCCServicePostEvent", "com.vmware.fusion", 0, 1, 1, "", "", "", "UNUSED", "", 0,1565595574)'
fi
If you’re running macOS Big Sur, This is moot as macOS Big Sur will not work with VMWare Fusion 11, let alone Fusion 10 (see the forums for more information).TCC.db is structurally different from macOS Catalina and so the script you need to run is
If you’re running anything above Catalina, to the best of my knowledge, you’re SoL. I’ll still keep the script up for anyone who may want to reappropriate it for something else.
# This script is pointless. VMWare Fusion 10 does not support Big Sur and cannot be (to the best of my knowledge) patched into doing so
# These commands apply to macOS Big Sur and may break if TCC.db's structure changes again
# If SIP is disabled, then give VMWare Fusion permissions
sysIntProtStatus="$(csrutil status)"
if [[ $sysIntProtStatus =~ "disable" ]]; then
  tccutil reset All com.vmware.fusion
  sudo sqlite3 "/Library/Application Support/com.apple.TCC/TCC.db" 'insert into access values ("kTCCServiceScreenCapture", "com.vmware.fusion", 0, 2, 3, 1, "", "", "", "UNUSED", "", 0,1565595574)'
  sudo sqlite3 "/Library/Application Support/com.apple.TCC/TCC.db" 'insert into access values ("kTCCServiceListenEvent", "com.vmware.fusion", 0, 2, 3, 1, "", "", "", "UNUSED", "", 0,1565595574)'
  sudo sqlite3 "/Library/Application Support/com.apple.TCC/TCC.db" 'insert into access values ("kTCCServicePostEvent", "com.vmware.fusion", 0, 2, 3, 1, "", "", "", "UNUSED", "", 0,1565595574)'
fi
Installing Docker⌗
You aren’t going to be able to use the Docker GUI. No, really. You’ll be greeted with this.
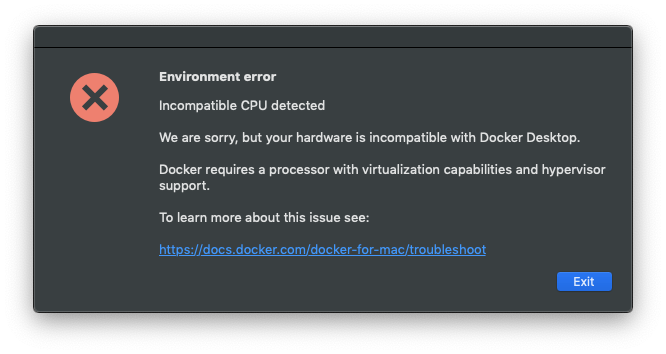
So we’re gonna do it another way, that, while won’t give us access to the GUI, will allow us to use Docker in the command line. Despite the limitations of Docker GUI, it does come with docker, docker-credential-desktop and docker-credential-osxkeychain and they’re pretty useful so we’ll still install it for the sake of having those binaries.
Even if we can’t run the actual UI.
Older guides often included a step that symlinked binaries from Docker.app to /usr/bin/local but that no longer works, it breaks the binaries themselves, giving you an error similar to this
kitty@kitty ~                                                                                 [13:44:01]
> $ docker
exec: "com.docker.cli": executable file not found in $PATH
Current PATH : /usr/local/bin:/usr/bin:/bin:/usr/sbin:/sbin:/Applications/VMware\ Fusion.app/Contents/Public:/Users/kitty/go/bin:/usr/local/opt/fzf/bin:/Users/kitty
If you do get errors like this, you need to do some cleanup before following this guide
find /usr/local/bin -type l -iname "docker" -delete
Now let’s get on with it…
# Now let's install Docker
brew install docker docker-compose docker-machine
brew install docker-machine-driver-vmware

# Now let's add Docker to our PATH variable
echo "export PATH=\"/Applications/Docker.app/Contents/Resources/bin/docker:\$PATH\"" >> ~/.zshrc
source ~/.zshrc
Depending on the shell you use, you may need to replace .zshrc (which is read by zsh) with .bash_profile (which is read by bash) or some other file that is loaded first by your shell. I thought of having it write to .profile but zsh doesn’t read .profile due to zsh having the tendency to break scripts, so I didn’t do that.
It’s bad practise anyways.
Now let’s create the default that Docker will be using in the background
Sidenote: this VM will be running silently in the background but if you open VMWare Fusion and then close it with default settings, it suspends the VM so to quit VMWare Fusion, use the shortcut Command + Option + Shift + Esc and enable “Confirm before closing” in Preferences
docker-machine create --driver=vmware default
docker-machine start default
You should be up and running with a VM, if you (like me), you something like Lilu, grant it network access and you should have a instance up and running.
Now, let’s have docker interact with default using the command below (I would suggest adding this to .zshrc/.bash_profile too)
eval "$(docker-machine env default)" # May create a small delay in loading your terminal
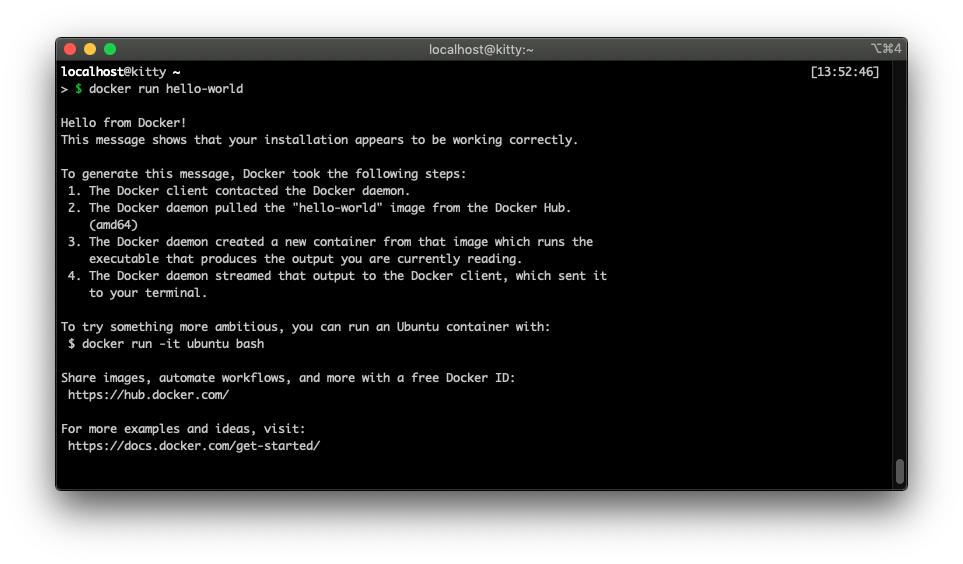
Now we should be done, let’s test if docker works as intended
docker pull hello-world
docker run hello-world
Here’s what you should get! Have fun! 🥳