


Setting up a Minecraft Ubuntu 18.04 vServer and securing it as quickly as possible

Most VPS hosts grant you a standard username and password combo (usually on your dashboard) to access your vServer’s root account.
There are two things problematic with keeping things as-is. First, you are directly using a root
account, which violates the principle of least privilege,
making an account compromise very rewarding and second, using public key authentication grants greater
security
in comparison to using a standard username and password combination.
Generating an SSH keypair⌗
This guide presumes you have a POSIX-compliant shell environment with an internet connection (using Windows Subsystem for Linux, Ubuntu, macOS, FreeBSD). If you’re using Windows, then consider installing Windows Subsystem for Linux (along with Ubuntu 18.04 or higher from the Microsoft Store) and come back to this guide.
You could do this natively on Windows using Windows-specific tools but…. I didn’t use them so I didn’t document them (I used a PopOS! virtual machine the whole time while I was on Windows :P).
On the client, let’s first define two functions that will make key-generation easier for us
(all client specific commands will be prefixed with kitty@kitty:~$ and everything else will
not contain any prefixing so you can copy and paste them)
kitty@kitty:~$ function genkey {
  # You may need to subsitute awk with gawk on macOS, for some reason it behaves differently
  TEMPVAR=$(hexdump -n 4 -e '4/4 "%08X" 1 "\n"' /dev/random | tr -s " " | awk '$1=$1')
  ssh-keygen -t ed25519 -f $HOME/.ssh/id_$TEMPVAR
  echo "IdentityFile $HOME/.ssh/ed25519_$TEMPVAR" >> $HOME/.ssh/config
  cat "$HOME/.ssh/id_$TEMPVAR.pub"
}

function fixssh {
  chmod 700 ~/.ssh
  chmod 644 ~/.ssh/authorized_keys
  chmod 644 ~/.ssh/known_hosts
  chmod 644 ~/.ssh/config
  chmod 600 ~/.ssh/id_*
  chmod 644 ~/.ssh/id_*.pub
}
Using our newly introduced functions, let’s create a keypair. It will look something like this once you execute it.
kitty@kitty:~$ genkey
Generating public/private ed25519 key pair.
Enter passphrase (empty for no passphrase):
Enter same passphrase again:
Your identification has been saved in /home/kitty/.ssh/id_CAFEBABE.
Your public key has been saved in /home/kitty/.ssh/id_CAFEBABE.pub.
The key fingerprint is:
SHA256:THISWILLBEYOURCHECKSUMTHISWILLBEYOURCHECKSUM kitty@kitty
The key's randomart image is:
+--[ED25519 256]--+
|  ..       .o    |
| .  .     .. o   |
|E .. .   .    +  |
| .  o ..o.   o   |
|    ..=.S..   .  |
|   . + B =     . |
|  . . O = *.  .  |
|   . + *o* *oo . |
|      +o=o=+=oo  |
+----[SHA256]-----+
ssh-ed25519 REPLACETHISWITHYOURKEYPAIRREPLACETHISWITHYOURKEYPAIRREPLACETHISWITHYOURKEYPAIR kitty@kitty
Now, copy ssh-ed25519 REPLACET...EYPAIR somewhere as we’re going to start configuring our vServer!
The first vServer login⌗
After experimenting with various distros (even naively trying out Arch Linux), I settled on Ubuntu 18.04 LTS and connected
to my vServer using ssh -l root 255.255.255.255 (replace 255.255.255.255 with your vServer’s IP address) and I defined
two variables which my commands will be relying on (it also means you can just copy and paste chunks!)
export USERNAME="minecraft"
# Replace SSH_PUBKEY with the pubkey you're using
export SSH_PUBKEY='ssh-ed25519 REPLACETHISWITHYOURKEYPAIRREPLACETHISWITHYOURKEYPAIRREPLACETHISWITHYOURKEYPAIR'
Now let’s create our relatively unprivileged user and add them to the sudoer’s group so that we can execute with root permissions when necessary.
adduser --gecos "" $USERNAME # You will be prompted to enter your desired password
adduser $USERNAME sudo
Let’s install all the necessary packages we need. We’re installing unattended-upgrades so that the vServer can upgrade its
software without manually running apt-get upgrade -y manually. We use fail2ban, aide (and later iptables-persistent) as
utilities to secure our vServer, screen so that we can run our server in the background, unzip and zip for archival operations
(useful for when you need to backup your server), openjdk-11-jre-headless as we’re
configuring a Java Edition server and finally, zsh and fonts-powerline for our preferred shell.
apt-get update
apt-get upgrade -y
apt-get install unattended-upgrades fail2ban aide \
  openjdk-11-jre-headless screen git unzip zip zsh fonts-powerline -y
apt-get remove --purge openjdk-8-jre-headless -y
Due to a documented bug with sudo (see, sudo: setrlimit(RLIMIT_CORE): Operation not permitted by juhp, we insert this line into our sudo configuration file.
echo "Set disable_coredump false" >> /etc/sudo.conf
Let’s prohibit root logins, password authentication and X11 forwarding by rewriting /etc/ssh/sshd_config
echo "Port 22" > /etc/ssh/sshd_config
echo "PermitRootLogin no" >> /etc/ssh/sshd_config
echo "PasswordAuthentication no"  >> /etc/ssh/sshd_config
echo "ChallengeResponseAuthentication no" >> /etc/ssh/sshd_config
echo "UsePAM yes" >> /etc/ssh/sshd_config
echo "PrintMotd no" >> /etc/ssh/sshd_config
echo "X11Forwarding no" >> /etc/ssh/sshd_config
echo "AcceptEnv LANG LC_*" >> /etc/ssh/sshd_config
Now we insert our public key into our username’s authorized keys by editing .ssh/authorized_keys from the home directory
mkdir /home/$USERNAME/.ssh
echo $SSH_PUBKEY > /home/$USERNAME/.ssh/authorized_keys
chmod -R 700 /home/$USERNAME/.ssh && chmod 600 /home/$USERNAME/.ssh/authorized_keys
chown -R $USERNAME /home/$USERNAME/.ssh
Using iptables we allow all outward traffic and block all inward traffic except on ports
22 (SSH), 19132 (Minecraft Bedrock Edition) and 25565 (Minecraft Java Edition). As iptables
rules do not persist on reboot, we use iptables-persistent to ensure that these rules are
enforced across system reboots (there is a manual prompt asking if you want to keep or inherit
the current ruleset, answer yes)
iptables -P INPUT ACCEPT
iptables -F
iptables -A INPUT -i lo -j ACCEPT
iptables -A INPUT -m conntrack --ctstate ESTABLISHED,RELATED -j ACCEPT
iptables -A INPUT -p tcp --dport 22 -j ACCEPT
iptables -A INPUT -p tcp --dport 19132 -j ACCEPT
iptables -A INPUT -p tcp --dport 25565 -j ACCEPT

iptables -A INPUT -j LOG
iptables -A FORWARD -j LOG
iptables -A INPUT -j DROP

apt-get install iptables-persistent -y
service netfilter-persistent start
systemctl enable netfilter-persistent
Now we setup automatic updates using --priority=high, so that we aren’t asked about package-specific
configuration unless it’s necessary
dpkg-reconfigure --priority=high unattended-upgrades
Let’s restart the SSH daemon so that it inherits the new changes
service sshd restart
Now before rebooting, I’d suggest opening a new terminal and testing if your new account’s login
works (because after rebooting, there’s no going back and you’d probably need to reinstall your distro)
using ssh -l [your username here] 255.255.255.255 (we cannot use $USERNAME as that is defined within
that shell session on the server and not on the client).
Once you confirm that it works, reboot your system and this will be the last time you’ll be using the root account directly.
reboot
The setup after the first reboot⌗
Once you’ve logged in using ssh -l [your username here] 255.255.255.255, we need to do one last thing
to ensure that the root account can never be used again for good.
We’re going to act as the root user by using sudo su. As root, we’ll prohibit using the root account at all
under any circumstances by modifying the start shell for the root user, invalidating the root password issued to you
by your hosting provider and ensuring that SSH will deny all root login requests
sed -i "s|root:/root:/bin/bash|root:/root:/sbin/nologin|g" /etc/passwd
echo 'auth    required       pam_listfile.so \' >> /etc/pam.d/sshd
echo "        onerr=succeed  item=user  sense=deny  file=/etc/ssh/deniedusers" >> /etc/pam.d/sshd
echo "root" >> /etc/ssh/deniedusers
chmod 600 /etc/ssh/deniedusers
passwd -l root
Okay, we’re done playing with fire and we’ll exit the root session by typing in exit and from here on,
we will use sudo for our privileged needs.
Till now you’re probably using the default bash shell that comes standard on every install. We’re going to
switch to a more versatile shell called ZSH, install a popular expansion for it called ohmyzsh and pick your favourite theme (I’m changing robbyrussell to bureau on the second line, you can replace it with a theme you like)
P.S: If asked to make zsh the default shell, say yes.
sh -c "$(curl -fsSL https://raw.github.com/robbyrussell/oh-my-zsh/master/tools/install.sh)"
sed -i 's/_THEME=\"robbyrussell\"/_THEME=\"bureau\"/g' ~/.zshrc
source ~/.zshrc
Once we’ve setup zsh, let’s setup a database to keep track of all changes made to important system files
sudo aideinit
sudo cp /var/lib/aide/aide.db.new /var/lib/aide/aide.db
sudo update-aide.conf
sudo cp /var/lib/aide/aide.conf.autogenerated /etc/aide/aide.conf
Now, let’s install Cisco’s ClamAV, update its definitions database using freshclam and add a repeating task as
root to instruct clamscan to run a full system scan and delete everything found to be malicious by ClamAV
(note, this does have the downside of false positives deleting files unnecessarily but the likelihood of that
is slim, but very much still there)
sudo apt-get install clamav clamav-freshclam -y
sudo freshclam -v
echo "0 0     * * *   root    clamscan -r -i –quiet /" | sudo tee -a /etc/crontab
Creating a swap partition is ideal, especially on systems that do not have adequate amounts of RAM. Though you should note that you should probably not do this if your vServer has an SSD as it will increase the wear-and-tear that it will undergo. This creates a 4GB swapfile and ensures that it’s automounted on every reboot (P.S: Swap devices do not work on vServer instances if they use LXC, see PeterSteele’s answer on the LinuxQuestions forum to know why so consider using KVM instead)
sudo dd if=/dev/zero of=/swapfile bs=1024 count=4194304 status=progress
sudo chmod 600 /swapfile
sudo mkswap /swapfile
sudo swapon /swapfile
echo "/swapfile swap swap defaults 0 0" | sudo tee -a /etc/fstab
echo "vm.swappiness=60" | sudo tee -a /etc/sysctl.conf
Setting up a Minecraft server⌗
I wasn’t happy with instructions existing online detailing how to set up a Minecraft server that a) had a reasonable permissions system and b) had a username-based whitelist so I got onto documenting how I set up mine.
What we are attempting to achieve⌗
- An installation of PaperMC (a fork of the popular Spigot server with emphasis on performance) 1.16 that restarts itself whenever it crashes
- The ability to authenticate players on the basis of their username using AuthMeReloaded and create a player whitelist using WhitelistPlayers
- Support for permissions using LuckPerms
Let’s start by downloading everything we need straight from the source.
Note: it might be a better idea to do this manually by downloading the latest version and then scp'ing it to your vServer, using the
commands below is lazy and will cause your server to run on outdated versions of plugins.
cd ~
mkdir -p pspigot/plugins && cd pspigot
wget -O paper.jar https://papermc.io/api/v2/projects/paper/versions/1.17.1/builds/120/downloads/paper-1.17.1-120.jar
wget -O plugins/ProtocolLib.jar https://github.com/dmulloy2/ProtocolLib/releases/download/4.6.0/ProtocolLib.jar
wget -O plugins/LuckPerms.jar https://ci.lucko.me/job/LuckPerms/1351/artifact/bukkit/loader/build/libs/LuckPerms-Bukkit-5.3.53.jar
wget -O plugins/AuthMe.jar https://github.com/AuthMe/AuthMeReloaded/releases/download/5.6.0-beta2/AuthMe-5.6.0-beta2.jar
Once we’ve downloaded most of the plugins we need, let’s create a launch script that ensures that if java crashes at any point
in time, the server will merely restart itself instead of quitting entirely.
echo '#!/bin/bash' > launch.sh
echo 'until java -Xms1500M -Xmx1500M -jar paper.jar; do' >> launch.sh
echo '    echo "Server crashed with exit code $?.  Respawning.." >&2' >> launch.sh
echo '    sleep 1' >> launch.sh
echo 'done' >> launch.sh
chmod +x launch.sh
Presuming you’ve read Minecraft’s EULA, tell PaperMC that you’ve read and agreed to it.
echo "eula=true" > eula.txt
We’re not done yet, we need to download WhitelistPlayers from Spigot’s website using a web browser due to protections used by Spigot that prevents the use of wget.
We can use scp on our client and presuming your default download path is ~/Downloads, we can just upload the files onto our vServer.
kitty@kitty:~$ scp -P 22 ~/Downloads/WhitelistPlayers.jar [email protected]:/home/minecraft/pspigot/plugins
Then we can run ./launch.sh for the first time so that our server runs. There are plenty of guides online
detailing how you can customize server.properties, spigot.yml and bukkit.yml so I won’t get into that
but I found that LuckPerms didn’t work right off the bat so we need to set it up.
Setting up LuckPerms⌗
LuckPerms has a really helpful editor that makes configuration setup a breeze. Go to the
LuckPerms Editor Demo to get a basic template of LuckPerms ready.
Then ensure that server operator permissions (group op) look like the image given below.

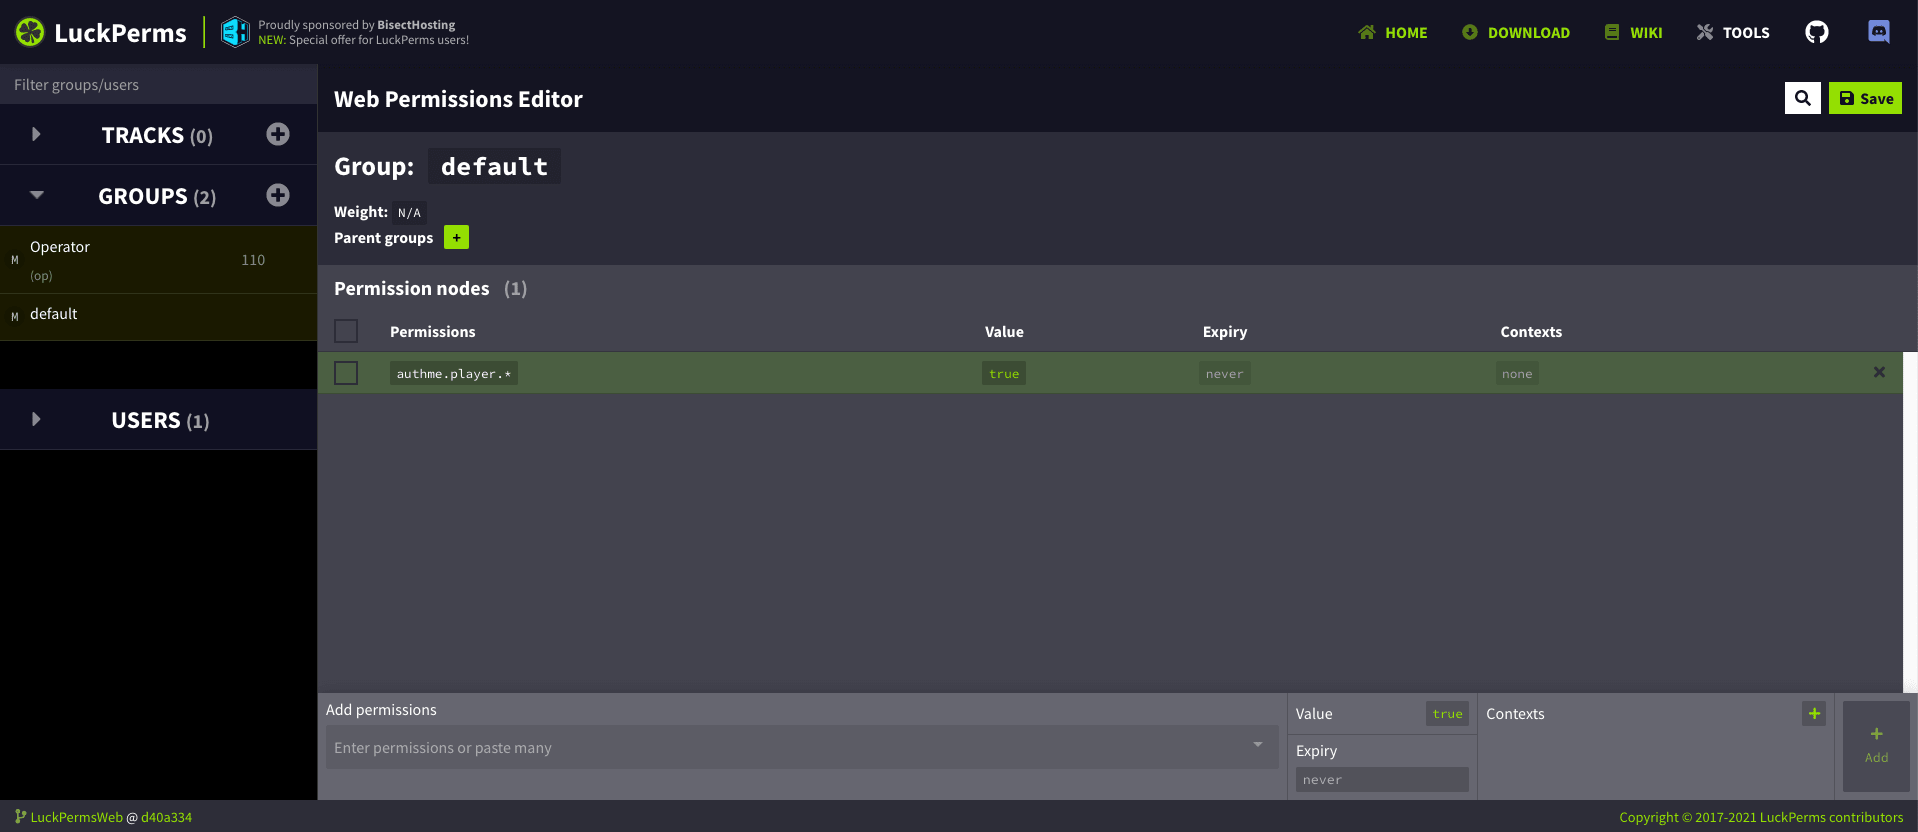
Then ensure that default permissions (group default) for your users look like the
image given below so that users can work with WorldGuard in the region you allocate
to them.
Login for the first time so that your UUID is registered with the server. Now from the server console, add yourself as a server operator using /lp user [username] permission set group.op true and add yourself to the whitelist using /wl add [username], then enable the whitelist using /wl on
Use /authme register [username] [password] to register yourself from the console, /register [password] [password] and /login [password] from your client.
Running PaperMC in the background⌗
Now that we’ve got our server running, there’s one small problem. If you terminate the SSH session, the
server will terminate as well. To prevent that, you need to use screen.
If your server is still running, use the stop command to shut it down. Then use screen and hit Enter (or Spacebar)
and you will be taken to another shell prompt that looks just like the one before. Run ./launch.sh and once the
server starts running, press Ctrl + A + D and you’ll be taken back to the primary shell.
Whenever you need to access the server console, all you need to do is log in via SSH, type in screen -list (not screen -l)
and you’ll be shown something like this:
minecraft@minecraft:~/pspigot$ screen -list
There is a screen on:
	519.pts-2.minecraft	(03/24/21 09:27:03)	(Detached)
1 Socket in /run/screen/S-minecraft.
Using screen -r 519 (replace 519 with whatever number you find there), you will be dropped in back to your
PaperMC server console and once you’re done, you can Ctrl + A + D out of there and you’re golden!